[Node.js] Excel file의 내용을 JSON으로 변환
January 10, 2023
목적
엑셀 파일의 내용을 JSON 형태로 바꾸어 필요한 곳에 이용한다.
방법
xlsx 모듈을 이용하여 아주 간단하게 변환할 수 있다.
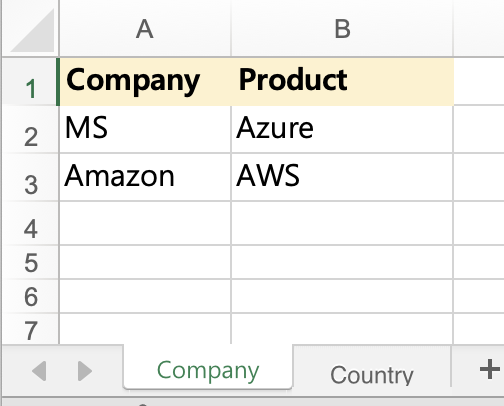
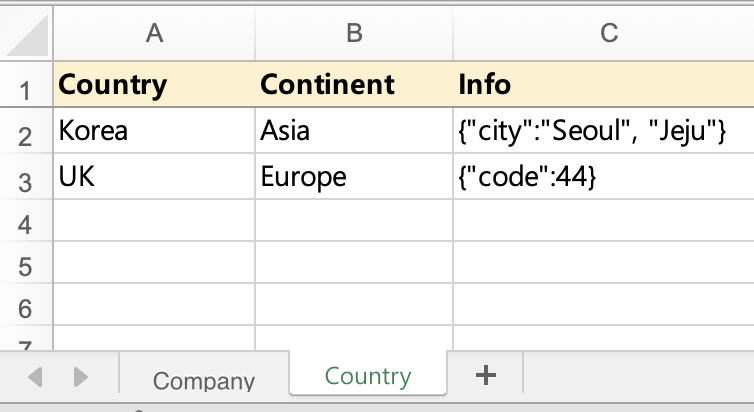
아래와 같은 데이터가 담긴 엑셀파일이 있다고 가정해보자.
지정한 위치에 변환이 필요한 엑셀파일을 위치시키고,
express app을 실행시킨 후 http://localhost:8080/excel 에 접속시 응답 값으로 내용을 확인할 수 있다.
const express = require("express");
const app = express();
const XLSX = require("xlsx");
const port = 8080;

app.get("/excel", (req, res) => {
  const xlsxFile = XLSX.readFile(__dirname + "/public/file.xlsx");
  const xlsxContents = xlsxFile.Sheets;
  res.json(xlsxContents);
});

app.listen(port, () => {
  console.log(`Example app listening on port ${port}`);
});
브라우저에 응답으로 표시된 내용을 조금 더 정렬된 형태로 살펴보면 아래와 같으므로 각 시트에서 필요한 값을 이용할 수 있다.
다만 아래와 같은 형태라면 실질적으로 필요한 값 이외의 다른 값들도 포함되어 있을 가능성이 크다.
따라서 모든 값을 가져오기 보다는 xlsx 모듈에서 제공하는 별도의 메서드를 활용하는 것이 좋다.
{
"Company": {
"!ref": "A1:B4",
"A1": {
"t": "s",
"v": "Company",
"r": "<t>Company</t><phoneticPr fontId=\"2\" type=\"noConversion\"/>",
"h": "Company",
"w": "Company"
},
"B1": {
"t": "s",
"v": "Product",
"r": "<t>Product</t><phoneticPr fontId=\"2\" type=\"noConversion\"/>",
"h": "Product",
"w": "Product"
},
"A2": {
"t": "s",
"v": "MS",
"r": "<t>MS</t><phoneticPr fontId=\"2\" type=\"noConversion\"/>",
"h": "MS",
"w": "MS"
},
"B2": {
"t": "s",
"v": "Azure",
"r": "<t>Azure</t><phoneticPr fontId=\"2\" type=\"noConversion\"/>",
"h": "Azure",
"w": "Azure"
},
"A3": {
"t": "s",
"v": "Amazon",
"r": "<t>Amazon</t><phoneticPr fontId=\"2\" type=\"noConversion\"/>",
"h": "Amazon",
"w": "Amazon"
},
"B3": {
"t": "s",
"v": "AWS",
"r": "<t>AWS</t><phoneticPr fontId=\"2\" type=\"noConversion\"/>",
"h": "AWS",
"w": "AWS"
},
"!margins": {
"left": 0.7,
"right": 0.7,
"top": 0.75,
"bottom": 0.75,
"header": 0.3,
"footer": 0.3
}
},
"Country": {
"!ref": "A1:C3",
"A1": {
"t": "s",
"v": "Country",
"r": "<t>Country</t><phoneticPr fontId=\"2\" type=\"noConversion\"/>",
"h": "Country",
"w": "Country"
},
"B1": {
"t": "s",
"v": "Continent",
"r": "<t>Continent</t><phoneticPr fontId=\"2\" type=\"noConversion\"/>",
"h": "Continent",
"w": "Continent"
},
"C1": {
"t": "s",
"v": "Info",
"r": "<t>Info</t><phoneticPr fontId=\"2\" type=\"noConversion\"/>",
"h": "Info",
"w": "Info"
},
"A2": {
"t": "s",
"v": "Korea",
"r": "<t>Korea</t><phoneticPr fontId=\"2\" type=\"noConversion\"/>",
"h": "Korea",
"w": "Korea"
},
"B2": {
"t": "s",
"v": "Asia",
"r": "<t>Asia</t><phoneticPr fontId=\"2\" type=\"noConversion\"/>",
"h": "Asia",
"w": "Asia"
},
"C2": {
"t": "s",
"v": "{\"city\":\"Seoul\", \"Jeju\"}",
"r": "<t>{\"city\":\"Seoul\", \"Jeju\"}</t><phoneticPr fontId=\"2\" type=\"noConversion\"/>",
"h": "{"city":"Seoul", "Jeju"}",
"w": "{\"city\":\"Seoul\", \"Jeju\"}"
},
"A3": {
"t": "s",
"v": "UK",
"r": "<t>UK</t><phoneticPr fontId=\"2\" type=\"noConversion\"/>",
"h": "UK",
"w": "UK"
},
"B3": {
"t": "s",
"v": "Europe",
"r": "<t>Europe</t><phoneticPr fontId=\"2\" type=\"noConversion\"/>",
"h": "Europe",
"w": "Europe"
},
"C3": {
"t": "s",
"v": "{\"code\":44}",
"r": "<t>{\"code\":44}</t><phoneticPr fontId=\"2\" type=\"noConversion\"/>",
"h": "{"code":44}",
"w": "{\"code\":44}"
},
"!margins": {
"left": 0.7,
"right": 0.7,
"top": 0.75,
"bottom": 0.75,
"header": 0.3,
"footer": 0.3
}
}
}위에서 언급한 코드를 아래와 같이 변경하면 간결하고 효율적인 결과물을 얻을 수 있다.
const express = require("express");
const app = express();
const XLSX = require("xlsx");
const port = 8080;

app.get("/excel", (req, res) => {
  const xlsxFile = XLSX.readFile(__dirname + "/public/file.xlsx");
  const xlsxContents = xlsxFile.Sheets;

  const usefulContents = [];
  let result = {};
  for (let sheet in xlsxContents) {
    const usefulContentsBySheet = XLSX.utils.sheet_to_json(xlsxContents[sheet]);
    usefulContents.push(usefulContentsBySheet);
    result[sheet] = usefulContentsBySheet
  }
  res.json(result);
});

app.listen(port, () => {
  console.log(`Example app listening on port ${port}`);
});
{
  "Company": [
    { "Company": "MS", "Product": "Azure" },
    { "Company": "Amazon", "Product": "AWS" }
  ],
  "Country": [
    {
      "Country": "Korea",
      "Continent": "Asia",
      "Info": "{\"city\":\"Seoul\", \"Jeju\"}"
    },
    { "Country": "UK", "Continent": "Europe", "Info": "{\"code\":44}" }
  ]
}